Guidelines for Performing Facilitated Stretches
Although facilitated stretching is an easy technique to learn, there are important, if subtle, factors to understand and master. In this section, we describe an easy-to-remember three-step stretching protocol, then discuss critical elements of the technique that must be applied to achieve optimum results.
Learn This Three-Step Sequence
Facilitated stretching incorporates active motion and isometric effort to improve flexibility and enhance motor learning in the process. Simplified, the three steps involved in facilitated stretching are these:
- The stretcher actively moves the limb to lengthen the muscle to be stretched (target muscle, antagonist) to its end-range.
- The stretcher isometrically contracts the target muscle for 6 seconds. The practitioner offers matching resistance and does not attempt to overcome the stretcher’s contraction.
- After the isometric contraction, the stretcher actively moves the limb again to stretch the target muscle to a new range of motion.
For example, to stretch the hamstrings, the stretcher begins by contracting the quadriceps and psoas (hip flexors) to actively move her leg to the starting position, without assistance. She then isometrically contracts the hamstrings for 6 seconds as the partner provides resistance. Finally, by contracting the hip flexors again to lift the leg higher, the stretcher actively stretches the hamstrings to a new length.
Rationale for Three-Step Sequence
The three-step sequence of facilitated stretching has developed over years of clinical practice. It was originally based on the premise that we were activating two neurological effects: reciprocal inhibition and postisometric relaxation. Current scientific consensus is that these effects may not consistently occur as previously believed. Unfortunately, we have no firm evidence of the physiological reasons that stretching is so much more effective using facilitated techniques. Research points to two promising hypotheses: an “increased tolerance to stretch” or changes in the viscoelastic properties of the stretched muscle.
Detailed Sequence for Facilitated Stretching
The more detailed steps involved in a partner-assisted facilitated stretch are as follows:
- The stretcher actively lengthens the muscle to be stretched (the target muscle) to its maximal pain-free end range. This is also called the soft tissue barrier or stretch barrier.
- For example, if you wish to stretch the hamstrings, have the stretcher lie on her back on a mat or a treatment table and contract her quadriceps and psoas (hip flexors) to actively lift the leg as high as possible, keeping the knee straight. This stretches the hamstrings to their end range.
- Assume a stable position that allows you to comfortably offer resistance to the isometric contraction of the hamstrings. Be sure the stretcher keeps her hips flat on the table/mat during the entire sequence.
- Direct the stretcher to begin slowly and “push” or “pull” to isometrically contract the target muscle as you provide matching resistance. Don’t allow the stretcher to overpower you. When the stretcher has achieved the proper level of isometric contraction (strong, but not maximum strength), hold it for 6 seconds.
- After the 6-second contraction, the stretcher relaxes and inhales deeply. During this time, maintain the limb in the starting position.
- As she exhales, the stretcher contracts the opposing muscles, in this case the quads and psoas, and pulls the target muscle into a deeper stretch. As the partner, do not push or pull to force the stretch.
- Now, as the partner, you will move into the new position to once again offer resistance.
- Repeat the process two to three times.
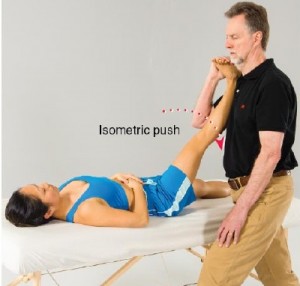
Facilitated Stretching Foundations and a demonstration of a hamstrings stretch on a treatment table, supine position.
Facilitated Stretch for the hamstrings on a yoga mat, supine position
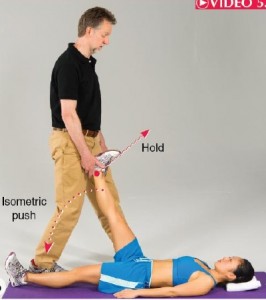
Facilitated Stretch on the treatment table for the hip flexors, prone position.
Stretch Pain Free
Facilitated stretches should always be pain free. If the stretcher experiences pain, try repositioning the limb or use less force during the isometric contraction of the target muscle. If pain persists, don’t use the technique for that particular muscle until you’ve determined why it’s causing pain.